96 lines
4.0 KiB
Markdown
96 lines
4.0 KiB
Markdown
# 昆仑芯XTRT-LLM使用指南
|
||
|
||
## 产品整体定位
|
||
|
||
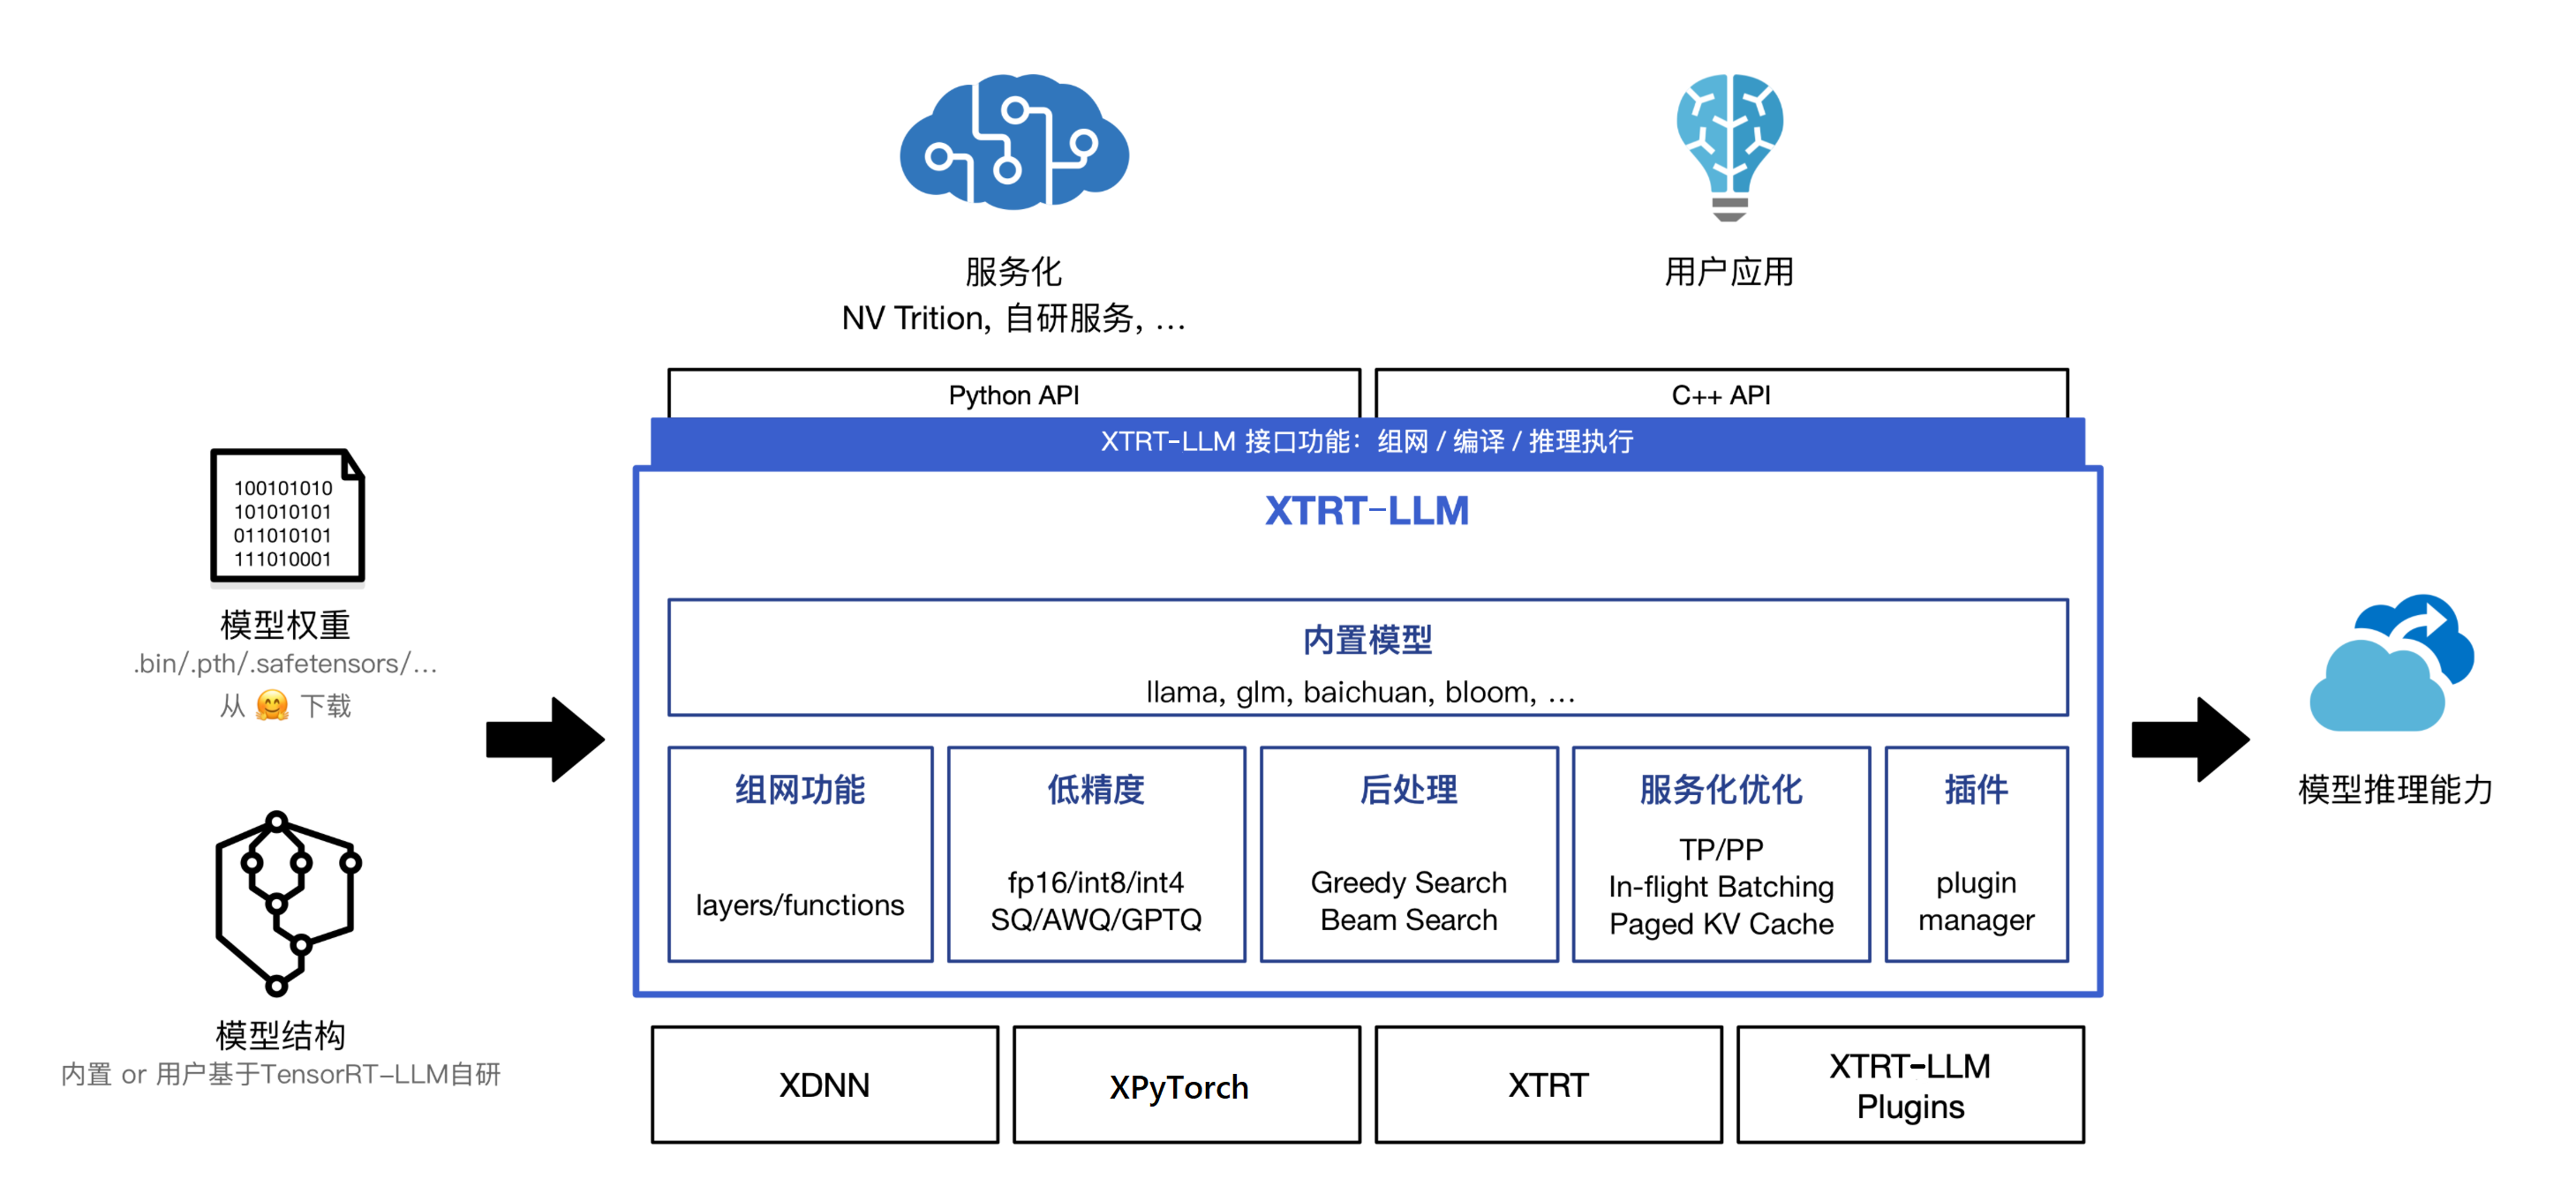
XTRT—LLM产品定位是快速对齐Nvidia的大模型产品,在不改或者少改几行代码的情况下,能够做到完全兼容现有TensorRT-LLM产品;以模块化、Python组网的方式来支持大模型的推理。保证用户在使用上不会感知底层运行时的不同,只需关注模型结构和对应的算法本身,通过简单配置就可以实现单卡和单机多卡分布式两种推理运行方式,也符合算法工程师普遍的使用习惯。下图是`XTRT-LLM整体架构图`:
|
||
|
||
|
||
|
||
## 使用场景
|
||
XTRT-LLM可提供以下场景的支持:
|
||
- 在已经使用TensorRT-LLM进行GPU模型的推理与部署的情况下,XTRT-LLM可支持用户快速完成模型的迁移与适配,提供高性能版本的XPU推理能力,降低对接成本。
|
||
- 在指定开源LLM进行部署和性能测试情况下,对于XTRT-LLM已经验证支持的模型,可直接加载Huggingface上的公版权重,进行高性能版本的模型推理。
|
||
|
||
## 环境搭建与Demo
|
||
XTRT-LLM的环境搭建需要下载对应的Docker环境以及XTRT-LLM的产出来搭建大模型的运行环境。大模型的运行需要有编译和运行两个阶段。每个模型的具体运行会略有差异,详细的模型运行步骤可以参考对应模型目录下的README.md文件,这里以LLama-7B模型的单卡运行举例
|
||
|
||
### 环境搭建
|
||
- 下载Docker image并启动Docker
|
||
|
||
```bash
|
||
# 下载Docker image
|
||
docker pull iregistry.baidu-int.com/isa/xtcl_ubuntu2004:v4.3
|
||
|
||
# 启动Docker
|
||
sudo docker run -it
|
||
--net=host
|
||
--cap-add=SYS_PTRACE
|
||
--device=/dev/xpu0:/dev/xpu0 --device=/dev/xpu1:/dev/xpu1 #根据实际的昆仑芯卡设备数选择--device映射的数目**
|
||
--device=/dev/xpu2:/dev/xpu2 --device=/dev/xpu3:/dev/xpu3
|
||
--device=/dev/xpu4:/dev/xpu4 --device=/dev/xpu5:/dev/xpu5
|
||
--device=/dev/xpu6:/dev/xpu6 --device=/dev/xpu7:/dev/xpu7
|
||
--device=/dev/xpuctrl:/dev/xpuctrl
|
||
--name xtrt_llm
|
||
-v /宿主机路径:/容器路径
|
||
-w /容器工作路径
|
||
iregistry.baidu-int.com/isa/xtcl_ubuntu2004:v4.3 /bin/bash
|
||
```
|
||
|
||
- 下载XTRT-LLM产出包并解压
|
||
|
||
```bash
|
||
# 去除代理
|
||
unset http_proxy https_proxy
|
||
# 下载产出包
|
||
wget https://klx-sdk-release-public.su.bcebos.com/xtrt_llm/release/v0.5.3/output.tar.gz && tar -zxf output.tar.gz
|
||
cd output/
|
||
```
|
||
|
||
- 设置代理
|
||
|
||
根据实际网络场景,设置`scripts/install_release.sh`脚本中代理配置
|
||
```bash
|
||
set_proxy() {
|
||
export http_proxy=xxx
|
||
export https_proxy=xxx
|
||
}
|
||
```
|
||
|
||
- 切换到运行环境
|
||
|
||
```bash
|
||
source /home/pt201/bin/activate
|
||
bash scripts/install_release.sh
|
||
source scripts/set_release_env.sh
|
||
```
|
||
|
||
### 运行模型
|
||
|
||
- 下载模型权重
|
||
|
||
以llama-7b为例
|
||
```bash
|
||
cd examples/llama
|
||
bash ../../scripts/download_model.sh llama-7b
|
||
# bash ../../scripts/download_model.sh <模型名称>
|
||
# 当前支持的模型有: llama-7b, llama-13b, llama-65b, llama2-70b, chatglm-6b, chatglm2-6b, chatglm3-6b, baichuan-7b, baichuan-13b, baichuan2-7b, baichuan2-13b, bloom, gpt-neox-20b, qwen-7b, qwen-14b, qwen-72b and gptj-6b
|
||
```
|
||
下载的模型权重默认存放在 `examples` 目录下各模型对应的文件夹下的`downloads`,例如`examples/llama/downloads`
|
||
|
||
- 编译模型
|
||
|
||
模型具体的build命令请参考 `examples` 目录下各模型对应的`README.md`或`README_CN.md`
|
||
根据需要添加build.py中的配置参数,该过程需要几分钟的时间,每次修改参数都需要重新执行编译过程。
|
||
```bash
|
||
python3 build.py --model_dir ./downloads/llama-7b-hf/ \
|
||
--dtype float16 \
|
||
--use_gpt_attention_plugin float16 \
|
||
--output_dir ./downloads/llama-7b-hf/trt_engines/fp16/1-XPU/
|
||
```
|
||
|
||
- 运行模型
|
||
|
||
模型具体的run命令请参考 `examples` 目录下各模型对应的`README.md`或`README_CN.md`
|
||
```bash
|
||
python3 run.py --engine_dir ./downloads/llama-7b-hf/trt_engines/fp16/1-XPU/ --max_output_len 128 --tokenizer_dir ./downloads/llama-7b-hf/
|
||
``` |